I settled on a Lehman design for my first seismometer. It is now installed in a crawl space in the house in a N-S direction so that it may best pick up activity from an east-west direction.
With my design, almost everything can be picked up with one trip to a Home Depot / Sears Hardware / Lowes circuit.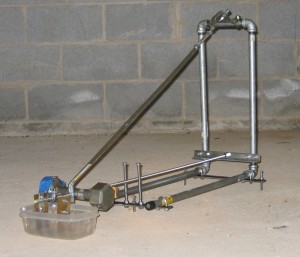 Here you see the general overview. (2) 18″ sections of 1/2″ pipe, (2) 24″ sections and (1) 5″ section. There are also (4) 90 degree elbows. There are 2 sections of angle iron on the upright and (2) sections of 1″ x 1/4″ cold-rolled steel for the bases. Some have used flanges for the uprights, mounted on a metal base. Unfortunately, the largest base I could find was 12″ x 12″ x 1/4″ steel, unless I ordered it from a metal supplier. My goal was to make something that could be easily copied if needed.
I have also installed pieces of 1″ angle diagonally to prevent flexion of the system.
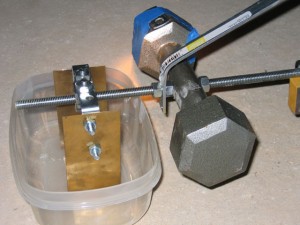 One of the most difficult components to find was the weight. Everyone else uses lead melted into a can. Years ago I had found (by luck) 5 pounds of lead at the hardware store. But, the thought of trying to melt it and getting lead poisoning scared me. So, I sacrificed a 5 lb hand weight instead – instant gratification, no toxicity…what more could you ask for. O, and BTW – the lead cost me $15, the weight was marked at $3. The tape on the far side is for some extra weight as I was not exactly precise in my drilling and it is somewhat off balance.
UPDATE: The weight was a good idea, but there was a lot of noise. Advice…go with the lead! As a source, go to a fishing shop and get some lead weights. It was easy to melt the lead with a propane torch (much easier than I thought) If you go this route, it might be wise to offset the hole through which the boom goes through. That way, there is less rotational rocking of the boom.
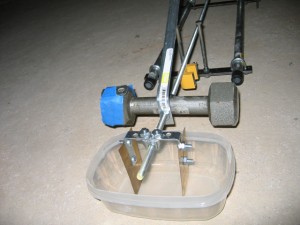 Here is the damping system – a U-bolt (for wire cable, I think 1/4″, just make sure it fits the boom. For me, I used a 3/8″ boom) and 2 angle and brass stock (I think you could use the brass plate for the bottom of doors). The tupperware is now partially filled with 10W-30 oil. Just another instance of kitchen-ware being sacrificed to the gods of scientific investigation.
The magnet stays there of it’s own accord. Some have glued it in place. I guess we’ll see if it stands the test of time.
UPDATE: I have now gone with a magnetic damping system. The oil was a PITA (pain in the …) and my crawl space now has a nice stain. Additionally, I was concerned with temperature changing the viscosity. Advice…go with the magnetic system.
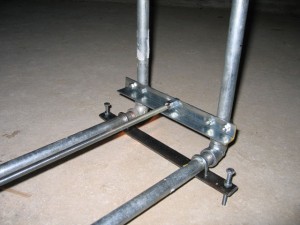 The boom rests on a 1/4″ steel ball bearing, which in turn rests on a polished 3/8″ bolt. It’s the gold-looking kind in Sears Hardware. I think that it is some type of alloy. Anyway, it’s polished to a mirror finish with a dremel tool.
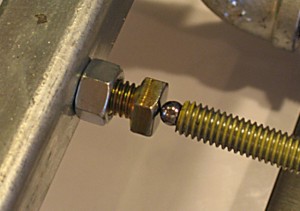 UPDATE: It was pointed out to me that the ball bearing actually should be on the mount and the polished bolt on the boom. This way, the actual point of contact remains fixed in relation to the mount.
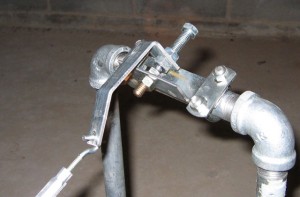 The top is the same way, ball bearing on a polished bolt head. I do not take credit for this design, as I copied it from John Cole. I have noticed that the ball bearings can slip on the polished surface of the bolt heads. I’ll wait and see if it becomes a problem. John Cole states that he has not had any problems.
UPDATE: My boom did in fact have problems with slipping downward. I believe that is was because the boom was heavier on the long side from the balance point at the weight. Advice…boom should be balanced.
The one thing that is missing from the design is some type of stabilizer – something to complete the hypotenuse of the triangle. I can see that vibrations up and down could be a problem. This can also be taken care of with a horizontal damper. (Note: see top of page regarding the stabilizing angle pieces.)
The entire apparatus is encased in a box made of 1″ Styrofoam to reduce the effects of air currents.
Currently, I have achieved a period of 19 seconds. I hope that will be enough.
The electronics for the project were purchased from Larry Cochrane at the Redwood City Public Seismic Network. Larry is very helpful and although they were not inexpensive, they make the process much easier to set up. He uses his own program called WinSDR to record the A/D signal. This program interfaces well with his other program WinQuake, which is used to analyze the data
Update (late 2007) – The Lehman is offline at present. The output from the coil is nill and I haven’t had the time to get into the crawlspace and figure out what is wrong. I will post if there is any change. Update (2012) – The Lehman is truly offline at present. I’m making arrangements to have it donated to a local college for their geology program. It was a wonderful experience for me to build and I hope that it excites future geologists.
